Introduction
“How to make Dell CT109 serial to PS2 cable” refers to crafting a custom cable that facilitates the connection between a Dell CT109 serial port and a PS/2 interface. This cable is essential when connecting old-fashioned hardware devices with serial port connectivity and new devices such as keyboards and mice that use the PS/2 style. It is necessary to understand how to create this cable if you are working with older computing gear like some Dell computers.
In this paper, we understand the specifications of the Dell CT109 Serial Port.
The How to Make Dell CT109 Serial to PS2 Cable used in most old Dell equipment. Every computer user knows that serial port interfaces, plugged into DB9 or DB25 connectors, have been used as data transfer interfaces in computing for ages. They send data one bit at a time, makingg them slower than modern interfaces such as Universal Serial Bus. However, it is globally accepted that serial ports are still helpful in specific applications for industrial/accessories and old-fashioned gadgets.
The CT109 model is targeted at supporting devices based on serial-compatible transmission protocols. As with this port, information on the pins of this port and the way by which this data is transferred is relevant. What may initially be visible are the labels for each of the pins, each of which will serve a different purpose or role, such as the data transmission pin (Tx), data reception pin (Rx), or ground pins (GND). It is the knowledge that will help you to connect it properly to the PS/2 interface.

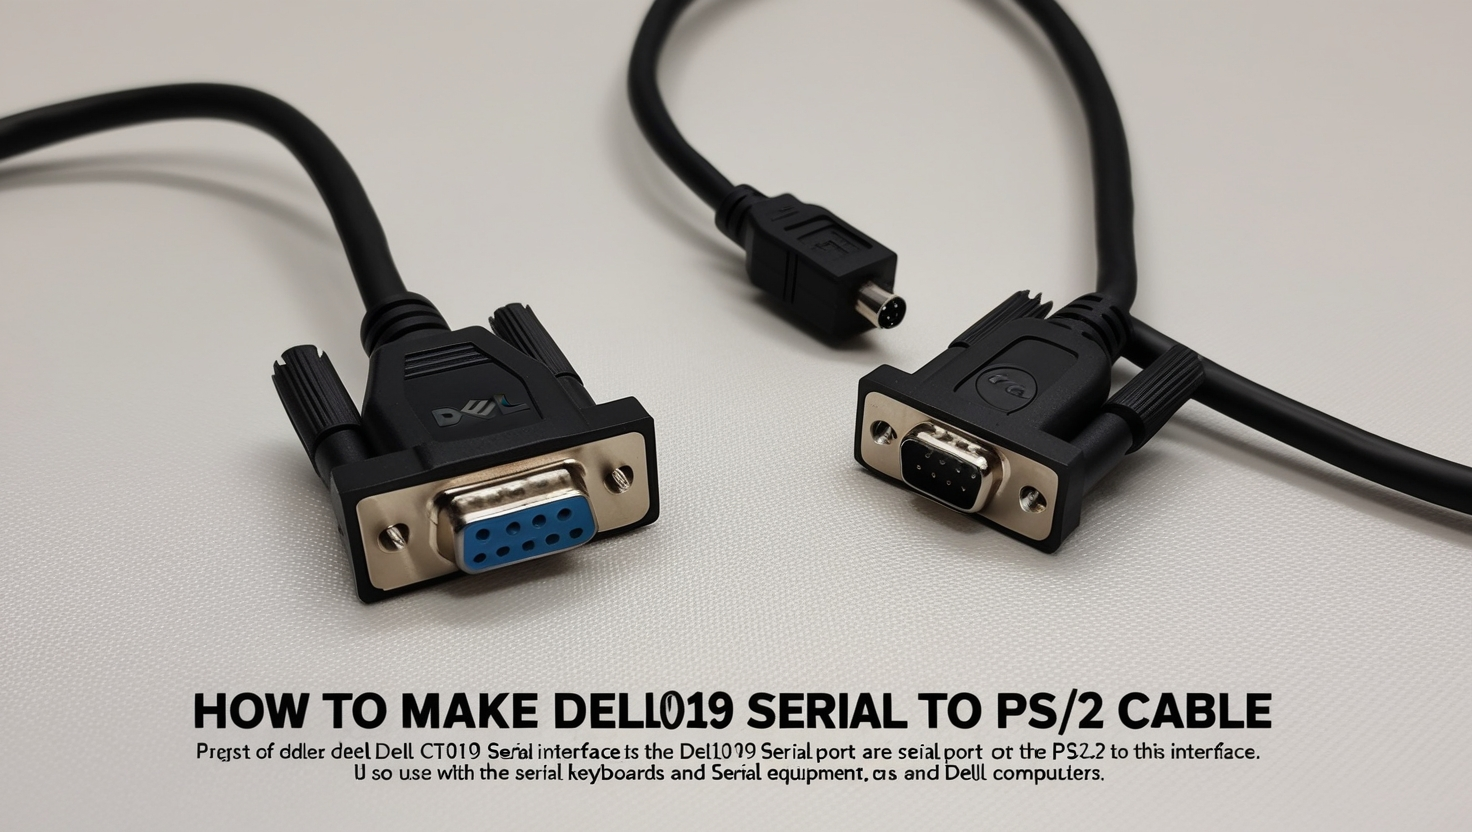
The Fundamental Characteristics of the PC Architecture
The PS/2 connector is a circular six-pin mini-DIN connection system mainly used for laptops, keyboards, and mice. It was primarily used in the 1990s and early 2000s but was mostly replaced with USB, though critical in most antecedent systems. The PS/2 interface works to send signals to the keyboard and mouse and has a proper voltage and signal type for its working.
When building a cable such as this Picture, it is essential to grasp the format of the outlet, which is the PS/2 connector above in the Picture. Individual pins for data, such as clock, ground, and power, are named with different numbers. Another challenge that requires alignment is these pins with the serial port for efficiency of the cable to work efficiently.
Why Create a Custom Cable?
For several reasons, crafting a custom How to Make Dell CT109 Serial to PS2 Cable might be required. If you use an old Dell with no USB port but want to connect a keyboard or mouse, this cable will do it for you. For example, such cables are not typically readily purchasable at computer stores because serial and PS/2 interfaces are gradually becoming outmoded; thus, the appropriation of cables entails designing them from scratch.
Furthermore, this process benefits people interested in retro computing, intending to restore and use older systems. Legacy hardware often requires unique connectivity solutions, and knowing How to Make Dell CT109 Serial to PS2 Cable provides a way to maintain functionality without compromising authenticity.
Tools and Components Needed
A cable is an electronic communication system that requires planning and development before forming cable materials and equipment. A DB9 or DB25 connector is essential for serial ports; however, the requirement might depend on the type of CT109 port. As before, an additional 6-pin mini-DIN PS/2 connector will be required for the PS/2 connection. The cable also has to afford adequate signal shielding so as not to allow signal interference to happen.
Other equipment and supplies include a soldering iron, solder wire, multimeter, wire stripper, and heat shrink tube. A multimeter is especially beneficial for continuity checks and to confirm that each pin is appropriately connected. Also, the How to Make Dell CT109 Serial to PS2 Cable connector will be mandatory as they will help with pin positioning.
Steps to Make the Cable
There is a need to adhere to specific techniques when making a Dell CT109 serial to PS/2 cable. Begin by defining the pin layout for both the Dell CT109 serial port and the PS/2 connection. Such information is available in wiring diagrams or some other technical documentation. To understand the pinouts further, you must cut the cable to the right length and remove all ends’ outer layer.
With the help of the soldering iron, connect the wires with the corresponding pins on the DB9 or DB25. Do the same thing for the PS/2 connector, considering each wire corresponds with some specific pin. Since the connections are finger-tight, they will be insulated with heat shrink tubing to increase shelf and operational life further and relieve mechanical strain. Following soldering, connect the cable with your multimeter and verify that each pin is correct and there is no shorting.
The last operation includes connecting the connectors and checking the cable with the target equipment. If all connection settings work correctly, the cable should enable the specified PS/2 device to interact with the Dell CT109 serial port. This completes making a Dell CT109 serial to a PS2 cable.
Challenges That One Faces in Making the Cable
Developing a How to Make Dell CT109 Serial to PS2 Cable may look very easy, but it may be difficult if it contains specific issues. In my case, those challenges were: Another problem working with these two tools is the definition of the compatibility between the two interfaces. The Serial bus and PS/2 use different signaling structures; hence, one might require an interface such as a signal converter.
There is also the problem of getting the parts needed for the fabrication of the device to be delivered. If you are looking for these high-quality parts, you may spend a few days searching for the proper connectors since the serial and the PS/2 connectors are gradually disappearing from the market. It is also essential that the cable is appropriately sheathed so that it will not cause any interference to the signal when being transmitted between the devices.

Importance of Testing
It is always essential to have the cable tested before the creation process is complete. Measuring continuity and checking for shorts through a multimeter will save time and protect the hardware. Moreover, during the joint testing of devices and the cable, it is possible to verify its performance. In case of some complications, troubleshooting will assist in determining the complication in case it occurs before intensive use.
This paper will take a historical perspective and explore the usage and implications of the Serial and /or PS/2 connections.
While USB has become incorporated into just about everything that was once reliant on serial or PS/2, both cannot be dismissed as having been relics of computing history. These links provided the basis of modern peripheral communication and are still used in some uses today. Learning to make Dell CT109 serial to PS2 cable offers a practical solution for legacy hardware and preserves the knowledge and skills required to work with these older technologies.
Uses of The Custom Cable
A Dell CT109 serial-to-PS/2 cable works in numerous situations, as explained below. It is instrumental in industrial settings where many old equipment runs with serial ports. As with other retrocomputing applications, this cable may interface keyboards or mice to earlier-generation Dell systems. It can also be reserved when contemporary analogs can not be used or do not fit.
Preserving Legacy Technology
Creating a cable like this is much more than practicing technology; this is about keeping legacy technology alive. By understanding How to Make Dell CT109 Serial to PS2 Cable, you contribute to the longevity of systems that might otherwise become obsolete. This knowledge will prove valuable in keeping older equipment online as a mission-critical asset for as long as possible.
In conclusion,
Knowing how to make Dell CT109 serial to PS2 cable is valuable for anyone working with legacy systems. One can build a cable that connects these two interfaces by knowing the components, collecting all the required tools, and following the correct sequence of actions. “How to Make Dell CT109 Serial to PS2 Cable” This process eliminates a pragmatic approach to establishing such links and prevents the often destructive erasure of past computing devices’ historical lineage and functionality.